How to Prepare a Concrete Slab for a Fountain Installation
June 22, 2012
Thinking about adding a fountain to your garden or yard and wondering what kind of preparation is needed to have one installed?
This article shows the process of pouring a concrete slab for a fountain installation and how to set up access points for water lines and electrical power for the fountain pump and accessories such as lights. It’s important that the builder or contractor pouring the concrete for your fountain slab follows these guidelines to ensure that the concrete pad is poured properly and up to spec to support the weight of your fountain and that the access points for water lines and electrical power to run your fountain pump and additional lighting are included.
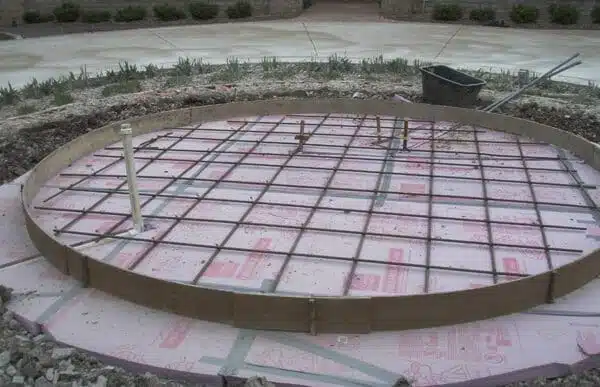
Let’s look at preparation for pouring concrete first. Compact the soil and then add a 6″ base of compacted gravel as your base. The compacted gravel is important because it drains water quickly and can have a greater load-bearing capacity than soil. The Gravel base will have a lesser potential for frost heave then regular soil.
Next, apply a 2″ barrier of Rigid foam insulation over the gravel. We recommend Owens Corning Foamular 250 Insulation Foam Sheets in 48″ x 96″ or 108″ sizes. The insulation helps to retain heat in the sub-grade soil and protect the slab from moisture beneath it. This helps to prevent frost heave in freezing climates. We recommend that you extend the insulation at least 12″ past the edge of the slab. In addition to the insulation benefits, it also creates a convenient means for locating pipes etc. and holding them in place before the concrete is poured.
Finally layout a grid of ½” Rebar with a 12″ on center pattern 2″ above the foam surface. The rebar adds structural support to the concrete and minimizes the potential for separation and damage from cracking. Here’s an example of a typical fountain slab installation and concrete water fountain molds before the cement has been poured:
Before the cement is poured you need to add your PVC drain pipe and penetration pipes for running your water lines and electrical power sources for the fountain.
We recommend a 3/4″ Brass Penetration as you see in the picture below:
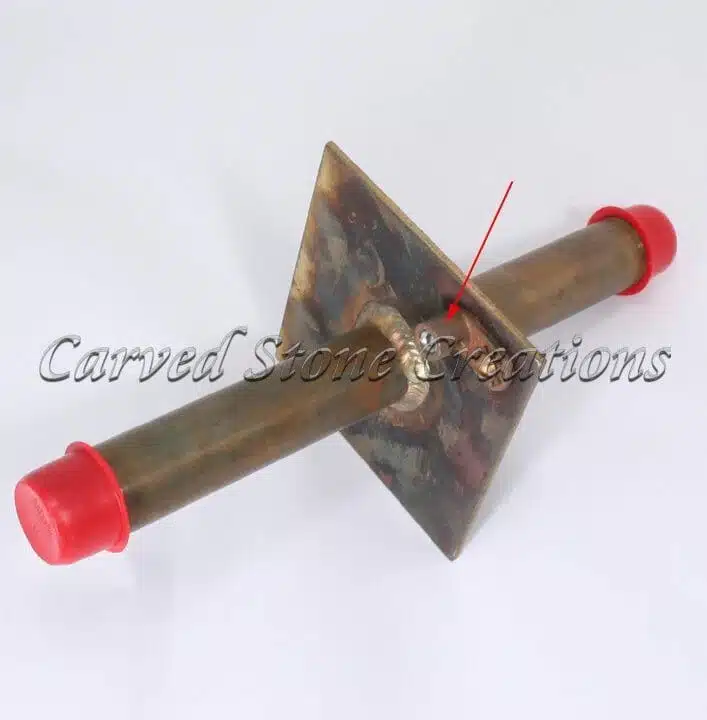
Threaded ends on both sides allow the PVC tubing to be attached to the base and for threaded and glued fittings to connect and seal the wiring at the top. Make sure the penetration is grounded to rebar as well. You can do this by sliding the wire through the brass lock down clamp indicated with the arrow. In the picture above, or by bolting the wire with the stainless steel bolt provided.
In the image below we created a simple diagram of how the penetrations should be installed:

As you can see in the picture, we recommend setting the penetration base plate 2″ below the top surface of the concrete. Here’s a diagram of how the PVC Drain should be installed:

Now the slab should be prepared to pour cement! We recommend using 4,000 Psi cement with Fibermesh additive. Fibermesh is essentially strands of synthetic fibers mixed into the cement (like fiberglass strands in resin) to prevent shrinkage during curing and cracking. Pour the fountain slab to a 6″ thickness (more if the diameter is 20′ or greater).
Another important design feature to consider is creating a concave depression in the concrete to allow for water to drain properly. We recommend that a horseshoe-shaped depression is formed that is at least 1″ below grade to allow for drainage as you see in the picture below of a finished fountain slab. This will ensure that your fountain drains properly and will not retain stagnant water when it is not in use or ice over winter.
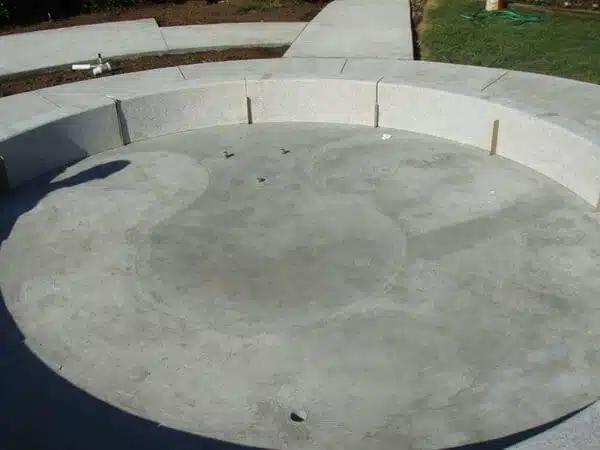
This can be created by attaining a flat surface on the wet cement. Then remove cement by shovel until the depression is created and troweling it smooth again.
Once you have the concrete poured and thoroughly set for at least 7 days (concrete takes an average of 21 days to fully cure), seal the edges of the penetrations and the drain with DECK-O-SEAL Sealant.
After we set the curb surround with epoxy we seal the joints with a similar DECK-O-SEAL caulk.

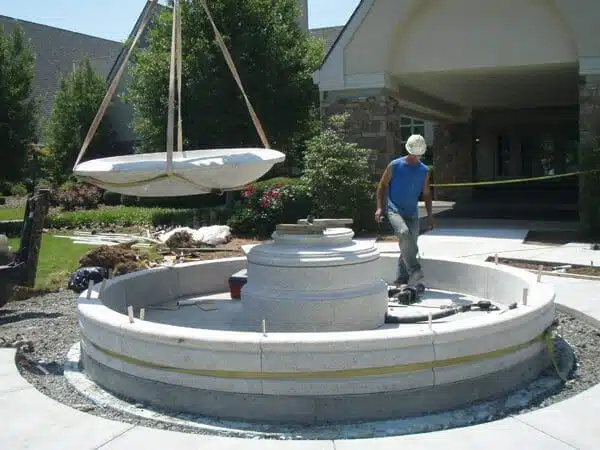
And there you have it, should your contractor follow these steps. You should have a properly prepared concrete slab to install your fountain on. Here’s a picture of our crew installing a fountain on the slab you saw above.
We typically include 3 penetrations in the fountain slab to accommodate waterlines from the home. For sprinkler system to run an autofill system, a standard high voltage wire to power the fountain pump, and an additional low voltage wire to power fountain lights. Even if you don’t desire to add an autofill system or lighting initially. We highly recommend that you have the penetrations included when the slab is poured. It will be much less expensive to have them included at this stage rather than coring out the concrete and adding them at a later date! Here you can see the fountain with the pump and lighting features installed.

The Autofill system is fed water from the home or a sprinkler system water line and it constantly monitors water levels and automatically ads water as needed. This keeps the water level at an appropriate level and helps to prevent the pump from burning out due to water starvation. The pump itself is run from a standard high voltage wire. We cap the penetration with a threaded and glued fitting and use a power disconnect coupling to supply power to the pump. This way you can simply lift the disconnect out of the water and shut down the pump. Without having to drain the surrounding pool to turn it off. For low voltage LED lighting we typically install a junction box on top of the penetration and feed wire from it to the lighting. High voltage wire will be needed for halogen lights.
Note: Please DO NOT attempt to pour the concrete slab on your own! This should only be done by an experienced builder or contractor. Consult with appropriate trades to make water and electrical connections to the home. If there are potential concerns with the stability of the soil due to the water table, etc. Then consult with a civil engineer beforehand.
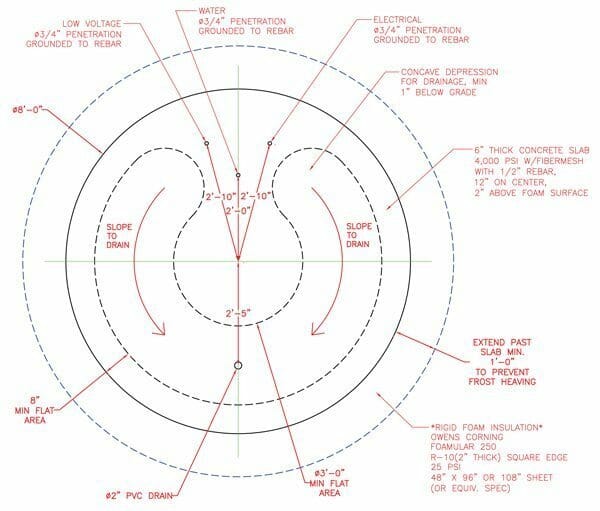
We often work directly with architects and builders on our projects and we supply them with detailed drawings for slab construction like the example you see below. These drawings are also available for the fountains that we have in inventory on our gallery as well.
Still, have questions regarding how to properly set up your concrete slab? Call us at 866-759-1920 or contact us for further instruction.
Looking for someone to design and install a fountain for you? Carved Stone Creations is located in Green Bay, WI. We are a reasonable drive away from many Midwest metro areas including Milwaukee, Madison, Chicago, Indianapolis, Fort Wayne, Minneapolis, St. Paul, Grand Rapids, Ann Arbor, Traverse City, Davenport, Des Moines, St. Louis, Kansas City, Cincinnati, and Columbus.
Visit our showroom to see first hand what we can design for you. Our convenient centralized location also means we can bring all of the tools and heavy equipment. That we need to tackle any installation job. We understand the effect our harsh Midwest winters can have on exterior stonework. We design and install architectural stonework like fountains, statues, exterior stone veneer, etc with those factors in mind. We’ll make sure the stonework we install for you stands up to the weather and the test of time! Outside of the Midwest? We can install there too. We have done work from New York to Florida to California as well.
